Latest Posts

Dustless Floor Sanding: How Dust-Free Sanding Actually Works

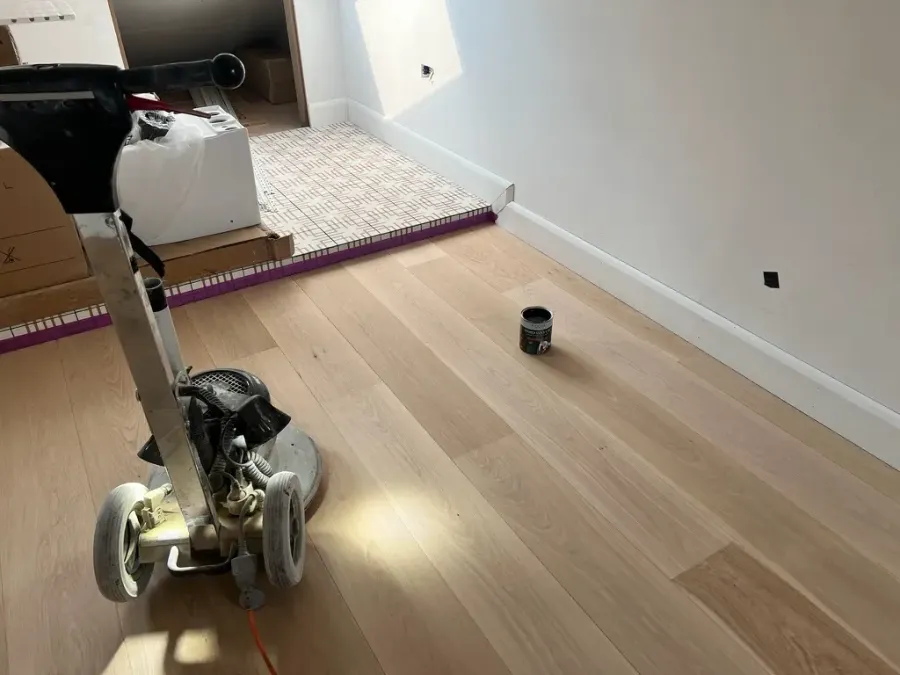
Dust-free floor sanding in progress on a wooden floor in London, showing the dramatic before and after difference.

There is a particular moment on a traditional floor-sanding job when everyone realises just how far wood dust can travel. It appears on shelves nobody opened, behind doors nobody touched and, somehow, on the one black jumper left at the opposite end of the house. Dust has an adventurous spirit.

That is why dust-free floor sanding has changed the way we restore wooden floors. Modern sanding machines connected to powerful extraction units collect dust close to the point where it is created. The result is a cleaner, more controlled process with far less disruption.

However, I want to be honest from the beginning: “dust-free” does not mean that a single particle can never escape. A responsible floor specialist should explain what the system can achieve, where its limitations lie and what will happen in your particular property.

I have spent many years sanding, repairing, cleaning, staining and finishing floors. One lesson returns on almost every project: good restoration is not about forcing a floor to become something new. It is about understanding what is already there and working with it carefully. Dust control is part of that respect, both for the timber and for the people living around it.

This guide explains how dust-free sanding works, why it matters, what it costs and what you should expect before, during and after the work.

The Short Answer: What Is Dust-Free Floor Sanding?

Dust-free floor sanding uses professional sanding machines connected to high-powered extraction equipment. As an abrasive removes the old coating and a thin layer of timber, the system draws most of the resulting dust through hoses and into a sealed collection unit before it can spread around the room.

The more technically accurate description would be “dust-controlled sanding”. Small quantities can still escape during edging, hand-detailing, repairs and abrasive changes. Nevertheless, a well-maintained professional system should be dramatically cleaner than sanding with an ordinary machine and a small collection bag.

For a fuller explanation of the terminology, equipment and realistic outcomes, read our guide to what dust-free floor sanding means.

Key Takeaways

  • Dust is captured close to the sanding point rather than cleaned up after it spreads.
  • Dust-free does not mean laboratory-clean or completely particle-free.
  • The main sander, edger and finishing machines all need effective extraction.
  • Good equipment must be supported by proper preparation, maintenance and technique.
  • Less airborne dust means less disruption and a cleaner surface before finishing.
  • Wood dust presents recognised health risks, so controlling it is more than a housekeeping exercise.
  • The condition and construction of the floor must be checked before sanding begins.
  • Cost and duration depend on the floor, repairs, access and chosen finishing system.

Why Does Floor Sanding Create So Much Dust?

Floor sanding is a controlled removal process. Each abrasive grain cuts through an existing coating and then removes tiny fragments of wood. A coarse abrasive may be needed to level uneven boards or strip a stubborn finish. Finer abrasives then remove the previous scratch pattern and prepare the surface for oil, lacquer or another suitable finish.

What comes off the floor is not simply clean sawdust. It may contain timber particles, old lacquer, oil, stain, filler and years of material held in gaps or grain. That mixture is one reason an old floor should be assessed rather than attacked enthusiastically with the biggest machine available.

The amount and size of dust produced can change according to the timber species, abrasive grit, sanding direction, machine speed and extraction performance. Peer-reviewed research into hardwood machine sanding has also found that the sanding conditions and material affect fine-dust creation. In other words, dust production is not identical on every floor.

Some particles fall to the ground quickly. Others are fine enough to remain suspended in the air. The dust we can see on a windowsill is annoying, but visibility alone does not tell us how well the finer material has been controlled.

Is Wood Floor Sanding Dust Dangerous?

Wood dust should be treated seriously. The UK Health and Safety Executive states that it can cause asthma and dermatitis. Hardwood dust can also cause cancer, particularly of the nose.

The current UK workplace exposure limits, measured as eight-hour time-weighted averages, are:

  • 3 mg/m³ for hardwood dust
  • 5 mg/m³ for softwood dust

Where hardwood and softwood dust are mixed, the lower hardwood limit applies to all the wood dust in that mixture. These are occupational limits, not a guarantee that any particular home is “safe” below a certain number. A domestic floor-sanding company will not normally be measuring the air in every room. The practical duty is to prevent and control exposure as effectively as reasonably possible.

HSE recommends extraction at woodworking machinery and advises that cleanup should use an industrial vacuum that meets at least Class M requirements. Dry sweeping and compressed air can throw settled fine dust back into the air, which rather defeats the object.

HSE also reports that carpenters and joiners are four times more likely to develop asthma than other UK workers. This does not mean that having one floor sanded gives a homeowner the same occupational exposure. It does show why people who work around wood dust repeatedly must use proper controls.

Good dust extraction protects the technicians as well as the customer. I sometimes compare it with caring for soil in a garden. If we only think about what is visible on the surface, we miss the system supporting everything underneath. A clean-looking room is reassuring, but the process used to control fine airborne material matters just as much.

People with asthma, respiratory sensitivities or other health concerns should discuss the project with both their contractor and, where appropriate, a healthcare professional. Children and pets may also be better away from the working area because sanding is noisy, doors may need to remain closed and wet finishes introduce separate restrictions.

How Does Dust-Free Floor Sanding Work?

The principle is simple: capture dust before it has the chance to travel.

As the sanding belt, drum or disc cuts the surface, a shroud around the working part of the machine helps contain the released material. Airflow pulls it into an extraction port, through a hose and towards a larger vacuum or collection unit. Filters retain fine particles while the dust is stored for controlled disposal.

A professional setup usually includes several tools:

  • A belt or drum sander for the main floor area
  • An edge sander for the perimeter
  • A multi-disc or finishing sander for refinement
  • Smaller tools for corners, stairs and awkward details
  • Sealed hoses and connections
  • A suitable professional dust extractor
  • Correct filters, bags or collection containers

The main machine often receives all the attention because it is large, heavy and makes a splendid entrance. Yet the edger may be the more revealing test of a contractor’s dust-control approach. If the main sander is connected to powerful extraction but the edges are completed with an unconnected tool, dust can still escape around the entire room.

The same applies to corner work and repairs. Cutting out damaged timber, hand-scraping beside doorframes or emptying a collection unit can all release material. Dust-free sanding is therefore a complete working method, not a sticker on one impressive machine.

Extraction and filtration are not the same thing

Extraction creates the airflow that moves dust away from the floor. Filtration captures particles from that extracted air. Both matter.

A high-grade filter cannot compensate for a split hose, blocked port or poor seal around the machine. Equally, strong airflow is not enough if the collected air is passing through an unsuitable or neglected filter. Bags fill, filters clog and hoses become damaged. Maintenance is not glamorous, but neither is discovering a trail of dust behind an expensive sander.

For a closer look at each component and stage, readers can continue to our guide on how dust-free floor sanding works.

Is Dust-Free Floor Sanding Really Dust-Free?

No sanding process should be promised as absolutely dustless.

Modern systems can capture the great majority of material created by the main sanding passes, but small amounts may escape when:

  • Edges and corners are detailed
  • Abrasives are removed or changed
  • Dust containers are handled
  • Gaps allow material to move below the boards
  • Loose boards need cutting or repair
  • A hose connection leaks
  • Filters or bags restrict airflow
  • Hand tools are used in confined areas

Several competing guides state that professional systems capture 95%, 98% or 99% of dust. Such figures may come from a manufacturer test involving a particular combination of machinery, extractor, filter and laboratory conditions. They should not be presented as a universal guarantee for every house.

Room shape, floor condition, operator technique and equipment maintenance all affect the result. Unless a percentage can be traced to documented testing of the exact system being used, it is safer to describe the practical outcome.

On a well-managed project, you should not expect clouds of dust moving through the home or thick residue coating adjoining rooms. You may still find a small amount of local dust around detailed areas. The contractor should vacuum the floor and working area thoroughly before applying a finish.

Honesty here builds trust. I would rather explain that a little residual dust is possible than promise a magical bubble around the sander. Floors respond well to patience and customers generally respond well to the truth.

For a more detailed look at realistic dust levels and the limitations of modern extraction, read our guide on whether dust-free floor sanding is really dust-free.

Dust-Free Sanding vs Traditional Sanding

Traditional sanding machines often rely on a small fabric bag attached to the machine. They may collect larger debris, but more fine material can escape into the room. Once airborne, it can travel into adjacent spaces and settle on walls, furniture, radiators and fittings.

Factor Dust-free sanding Traditional or poorly extracted sanding
Dust control Captured close to the source More dust escapes into the room
Cleanup Usually limited and controlled Can be extensive
Airborne particles Significantly reduced More likely to spread
Equipment Connected extraction system Basic bag or limited extraction
Preparation for finishing Cleaner working surface Greater contamination risk
Occupied properties More manageable Usually more disruptive
Contractor skill Still essential Still essential
Initial price May reflect specialist equipment May appear cheaper

Dust control is not the only difference between a good and poor job. A skilled technician can still damage a floor with a sophisticated machine if the abrasive choice, direction or pace is wrong. Conversely, extraction does not repair loose parquet, diagnose moisture or select the correct finish. It improves the working method; it does not replace judgement.

Our detailed dust-free vs traditional floor sanding comparison examines these differences more closely.

The Benefits of Dust-Free Floor Sanding

Less disruption

The most immediate benefit is a more manageable home. There is less need for a whole-property cleaning operation after the sanding stage and a lower risk of dust finding its way into cupboards or soft furnishings.

I once visited a customer who had experienced traditional sanding years earlier. Before our arrival, she had wrapped almost everything in plastic, including a large indoor plant. It looked ready for a journey into space. When she saw how the extraction worked, her shoulders visibly relaxed. That change in the customer’s experience matters. Restoration should improve a home, not make its owner dread every stage.

Better control of airborne material

Capturing dust at source is more effective than allowing it to spread and trying to remove it later. It is especially valuable in occupied homes, offices, shops and other properties where adjoining areas remain in use.

Cleaner preparation before finishing

Dust left on a prepared floor can settle in a wet coating and create a rough or uneven appearance. Thorough extraction and final vacuuming help provide a cleaner surface for staining, oiling or lacquering.

This does not mean dust-free sanding automatically makes a finish more durable. Durability also depends on surface preparation, product compatibility, application, drying conditions, curing time and later maintenance. It does, however, remove one avoidable source of contamination.

Better visibility

When dust is controlled, the technician can see the scratch pattern, edges and emerging timber more clearly. This makes inspection between sanding stages easier.

Less post-project cleaning

Some local cleaning remains sensible, but customers should not be faced with heavy dust throughout the building. The time saved can offset part of any additional cost associated with specialist extraction.

You can explore these points further in our complete guide to the benefits of dust-free floor sanding.

What Are the Limitations?

Dust-free sanding is not silent, odourless or suitable for every floor.

The equipment can be noisy. Hoses and extraction units need space. Stairs, corners and narrow landings require smaller tools and more hand-detailing. Repairs such as cutting replacement boards can create dust outside the main sanding system.

The finishing stage presents separate considerations. A water-based lacquer, oil or solvent-containing product may have an odour and its own ventilation, occupancy and curing instructions. Low dust does not mean low odour, and “dry to the touch” does not mean fully cured.

Finally, extraction cannot make an unsuitable floor safe to sand. If an engineered board has a very thin wear layer, or an old floor contains an unidentified coating or adhesive, assessment must come first.

Which Wooden Floors Can Be Sanded?

Solid hardwood

Solid hardwood can often be sanded several times during its life, although the available thickness above tongue-and-groove joints and fixings must be checked.

Softwood floorboards

Traditional pine and other softwood boards can usually be restored, but their age, movement, gaps and past repairs influence the method. Soft timber is also easier to mark through poor machine control.

Parquet and herringbone

Parquet can produce beautiful results. It also demands care because the grain changes direction across the pattern. Loose blocks, old adhesive and uneven areas must be addressed before the sanding sequence is chosen.

Engineered wood

Some engineered floors can be sanded, but only the upper wear layer is real timber suitable for removal. Its remaining thickness must be established. Guessing is expensive. Sand through that layer and the decorative surface cannot simply be put back.

Stairs and detailed areas

Stairs, landings and spaces beneath radiators can be sanded with smaller equipment. Because more edge and hand work is involved, a little more residual dust may be possible.

Laminate is not treated in the same way because its decorative surface is not a thick layer of solid wood. Severely unstable floors, very thin engineered boards and floors affected by substantial moisture problems may need a different repair or replacement strategy.

The Dust-Free Floor Sanding Process

1. Inspection

The first step is to understand the floor. We look at its construction, thickness, moisture condition, movement, damage and existing coating. We also ask what the customer wants the room to feel like when the work is finished.

That final question is not fluffy decoration. A pale matt floor in a busy family kitchen has different practical demands from a richly stained parquet floor in a formal sitting room.

2. Room preparation

Furniture and rugs are removed. Curtains, fragile objects and nearby belongings may also need moving. Access, electricity, ventilation, parking and waste handling should be agreed before the machines arrive.

3. Repairs

Loose boards are secured where appropriate, proud fixings are dealt with and damaged sections may be replaced. Parquet blocks sometimes require stabilisation. Gaps are assessed rather than automatically filled, because natural board movement can cause unsuitable filler to crack.

4. Initial sanding

The first cut removes the old finish and begins correcting unevenness. The starting abrasive depends on the floor. Beginning too aggressively can remove unnecessary timber; beginning too fine may waste time and abrasives without removing the coating evenly.

5. Edges and corners

The perimeter is brought to the same standard as the main field. Edge sanding should blend into the central area without leaving a darker frame or visible circular marks.

6. Intermediate and fine sanding

Successive abrasives refine the surface and remove scratches from the previous stage. Skipping too far between grits can leave marks that only become obvious when stain or finish is applied. By then, the floor has a rather inconvenient way of remembering every shortcut.

7. Filling and detailed preparation

Where suitable, gaps, nail holes or small defects are filled with a compatible material. The floor is then finished to a consistent scratch pattern.

8. Final dust removal

The room, edges and floor are vacuumed carefully. Dry sweeping should be avoided because it can return fine material to the air. The surface is inspected under good lighting before any coating is applied.

9. Staining and finishing

If a colour change is required, test samples should be agreed on the actual floor where possible. Oil, hardwax oil or lacquer is then applied according to the chosen system and manufacturer instructions.

10. Drying, curing and handover

The customer receives clear instructions about foot traffic, furniture, rugs and cleaning. These timings must be based on the actual finish used, not on a universal rule found online.

How Long Does Floor Sanding Take?

A straightforward room may be sanded and begin receiving finish within one or two working days. Larger areas, repairs, stairs, parquet patterns, staining and multiple coats extend the schedule.

The main variables are:

  • Floor area and layout
  • Existing coating
  • Board condition
  • Required repairs
  • Sanding sequence
  • Colour sampling and staining
  • Finish type and number of coats
  • Temperature and humidity
  • Access and working-hour restrictions

Drying and curing are also different. A coating may accept careful foot traffic before it reaches full hardness. Furniture and rugs often need to wait longer. The product’s technical guidance and the contractor’s written handover advice should take priority.

For a more detailed timeline, see how long floor sanding takes.

How Much Does Dust-Free Floor Sanding Cost?

There is no reliable one-price answer because sanding is only one part of the restoration.

Cost is influenced by:

  • Square metres
  • Timber type and pattern
  • Existing floor condition
  • Board or parquet repairs
  • Gap filling
  • Stairs and difficult edges
  • Staining
  • Finish specification
  • Furniture removal
  • Access, parking and location
  • Waste removal and VAT

A recent UK consumer guide placed professional sanding and refinishing broadly between £20 and £65 per square metre, while citing around £40 per square metre as one contractor’s guide price. These figures are useful only as general context. They are not a tariff for dust-free sanding and cannot account for what is hidden beneath an old coating.

A quotation should explain what is included: preparation, repairs, sanding, filling, finish coats, dust control, cleanup and taxes. A cheaper total can mean a smaller scope or lower-cost finishing product, so compare like with like.

Our dedicated dust-free floor sanding cost guide goes into the variables in greater detail.

How to Prepare Your Home

Before the work begins:

  • Remove furniture, rugs and personal items from the room.
  • Take down low curtains if requested.
  • Move fragile objects from nearby shelves because machines create vibration.
  • Arrange safe access and parking.
  • Discuss appliances, doors and fitted furniture.
  • Keep children and pets away from the working area.
  • Ask when you may walk on the floor and replace furniture.
  • Confirm who handles waste and final cleaning.
  • Tell the contractor about allergies, sensitivities or known historic materials.

Do not seal vents or change ventilation arrangements without discussing the plan. Sanding extraction and finish ventilation serve different purposes, and the contractor should account for both.

Can You Stay at Home During the Work?

Often, yes, especially when only part of the property is being restored. But possible does not always mean pleasant.

Sanding is noisy. Rooms and routes may be inaccessible. Children and pets need protection from machinery, cables and wet finishes. People with respiratory sensitivities may prefer to stay elsewhere. The coating system may also require ventilation or temporary absence.

Ask the contractor about each stage rather than assuming “dust-free” means normal family life can continue around the machine.

Professional Dust-Free Sanding vs DIY

DIY sanding can look economical when the calculation includes only machine hire. The real comparison should also include abrasives, extraction, finish, protective equipment, repairs, time and the possibility of corrective work.

Professional contractors bring more than machinery. They assess the remaining thickness, recognise different coatings, choose an abrasive sequence, blend edges and control the rate of timber removal.

Common DIY problems include:

  • Drum or belt marks
  • Uneven sanding
  • Rounded edges
  • Scratches left beneath the finish
  • Patchy stain absorption
  • Sanding through an engineered wear layer
  • Dust spreading from poorly connected equipment

A small, forgiving area in reasonable condition may be manageable for an experienced DIYer. Valuable parquet, thin engineered wood, extensive repairs, old coatings or a floor expected to have a high-quality stained finish justify professional assessment.

Read our guide to common floor sanding mistakes before deciding.

How to Choose a Dust-Free Floor Sanding Contractor

Ask practical questions:

  1. Which sanding and extraction equipment will you use?
  2. Is extraction connected to the edger and finishing machines?
  3. How do you maintain filters, bags and hoses?
  4. How will you protect adjoining areas?
  5. What residual dust should I realistically expect?
  6. How will you check whether the floor can be safely sanded?
  7. Are repairs, finish coats, cleanup and VAT included?
  8. Can you show comparable completed projects?
  9. What happens if the wear layer is too thin?
  10. What aftercare guidance will I receive?

Be cautious if someone guarantees zero dust, gives a firm price without understanding the floor or cannot explain how detailed areas are managed.

A trustworthy specialist should also be comfortable saying, “I need to inspect that first.” Certainty can sound impressive, but careful uncertainty is often the more experienced answer.

Aftercare Following Dust-Free Floor Sanding

The finish protects the newly prepared timber, but it needs time and appropriate care.

Follow the specific handover instructions for:

  • Light foot traffic
  • Furniture replacement
  • Rugs
  • Full curing
  • First cleaning
  • Suitable maintenance products

Lift furniture rather than dragging it and fit clean protective pads. Use entrance mats to reduce grit, but do not replace rugs before the finish permits it. Clean with a product intended for the chosen coating and avoid soaking the floor.

Over time, a maintenance clean or recoat may restore protection without another full sanding. This is both economical and more sustainable because it preserves the timber rather than removing material unnecessarily.

That approach reflects something I value beyond floor care. In gardening, healthy growth rarely comes from repeatedly cutting everything back to the ground. Often, the wiser action is timely maintenance. Wooden floors are much the same.

When Should You Choose Dust-Free Floor Sanding?

Most modern projects are better served by extraction, but the decision is worth making explicitly rather than by default.

Dust-free sanding is the right choice if:

  • You are living in the property while the work happens
  • The home is furnished, or adjoining rooms stay in use
  • Someone in the household is asthmatic or sensitive to dust
  • The property has to go back into use quickly
  • You want the cleanest possible surface before finishing

Traditional sanding can still make sense if the property is empty, the budget is genuinely tight, and you are prepared for the cleanup afterwards. In an occupied London home, that combination is rare.

Is Dust-Free Floor Sanding Worth It?

For most professional restoration projects, effective dust extraction should be expected rather than treated as a decorative extra.

It reduces disruption, controls airborne material, limits cleanup and creates a cleaner surface before finishing. Its value is especially clear in occupied homes, furnished properties and commercial environments that must return to use promptly.

The machinery is only part of the answer. A successful result comes from careful assessment, well-maintained extraction, disciplined sanding, suitable finishing and honest communication. When these elements work together, restoration becomes calmer and more predictable.

No floor is entirely separate from the life lived above it. It carries footsteps, moving chairs, muddy shoes and the occasional dropped cup of tea. Restoring it should respect both the material and the household around it.

At Silver Lining Floor Care, we approach dust-free sanding as part of a complete floor-care system rather than a marketing phrase. We assess the timber, explain realistic outcomes and select the repair, sanding and finishing process the floor genuinely needs. That combination of technical care and straightforward advice helps preserve wooden floors while making their restoration far easier to live with.

Sources

White Wash Timber Floors: Ideas, Benefits and CareAllergies and Flooring